Friday, September 26, 2008

Mobile Photograph Hanger


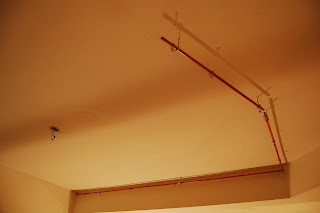
A few years ago, I was at the gift shop in the museum and I saw this crazy picture holder for 15 dollars. I couldn't afford something like this at the time and today I will be showing you how I came to build it. For those of you that don't know what a mobile is, it is an ornament that you see above baby cribs and just hangs for aesthetic purposes. The picture on the left shows what we want to recreate using other materials to get the same product. Originally, I did not have a picture to reference what a mobile actually looks like. What I did was draw on a piece of paper and made up my own interpretation of what I thought it would be. This is a good idea because you are allowing yourself to creatively input some of your ideas into an already made product. Doing so makes it a product of your own.

The photograph below is the one I drew.


What You Need:
Pliers (to attach the string to the alligator clips)
Saw (to cut your rods)
Alligator Clips (bought at Radio Shack 2.99 for 12)
Picture Hanging Wire or Wire (I used two beaded necklaces that I found from my desk)
Two long wooden rods (48 inches long bought at Home Depot or you can find some at Walmart)


I used two packed of alligator clips and two long rods. I didn't have to pay for the wire because I had some so...

2x(2.99) + 2(.59) = $7.16


Putting it Together:

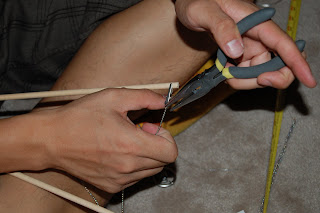
First, I cut my rods into two 24 inch pieces, and four 12 inch pieces. Second, I cut my strings into 8 equal pieces and 3 long pieces. I attached two clips on the ends of the strings so that one clip grabs the rod and the other clip grabs the picture. With time and some creativity I came up with this.


This is what I ended up with


Thanks for reading!

kudos,
Jeff

Thursday, September 18, 2008

Seductive Fabric Curtains

This is a follow up on my drape posting. If you would like to know how to create a drape please go to the previous posting. The purpose of this is to create a fashionable curtain using a sewing machine and fabric. I wanted to keep natural sunlight shining through my room so I chose thinner/transparent sheets of fabric.

What you'll need:

Fabric (I chose a solid black and a black/white leafy design. 1$ per yard at Walmart)
Sewing Machine (to sew the two fabrics together. Not necessary for single fabrics)


Before you begin buying fabric, I suggest you calculate the length from the ceiling to where you want the curtain to fall. In addition measure the region you will be covering. In my example, I chose the curtain to fall 69 inches from the ceiling and the region I will be covering is 211 inches. With this information, I can estimate how many panels I can cut because buying fabric comes with a fixed width. dividing 211 inches by that fixed length will give you how many panels you should make and multiplying those panels by how far you want the curtain to fall should give you the total number of inches you should buy. Convert that into yards and you will have to buy that amount of fabric. Keep in mind that this is an estimation so you might want an extra yard or two so you don't mess up in calculations. After I sewed my fabric together I simply hung them up on clips.

This is what it looks like

At certain angles depending on the light, you are able to see the design or straight through the curtain. I was surprised to notice this effect and was very happy with the results.

This is a picture with the curtains tied into knots

thanks for reading!

kudos,
jeff

Tuesday, September 16, 2008

The Drape


I've recently moved into a loft and will be facing one of the most difficult rooms to design for a college student. For those of you that don't know what a loft is, www.dictionary.com defines a loft to be a balcony or platform built over a living area and used esp. for sleeping. Lofts are very open and don't provide any privacy. I would like to create something cheap and stylish that will cover my room without building a wall. This can be done by using drapes or taking the invention of curtains. For this project I will be examining drapes and what we can do to make our own.


A drape is a horizontally held rod, made of plastic or cheap metal, that holds a long piece of fabric in order to cover a window. There are two brackets that support the load applied by the rod. This picture you see on the left is an actual drape, but I've used it to hold my jackets and dress shirts. This was bought at Ross for $5.99. I needed something that would span 134 inches for one wall and another that would span 77 inches. I indeed found two drapes and the total cost came to be $32.85. As you can see, it was very expensive for a stick and two brackets that held them in place.


My Draping System

What you'll need:

A measuring tape (.99 cent store)
Rod (I used 5 wooden rods from home depot, $1.95 each)
Curtain hangers (used to hold your fabric, 14 for $2.99)
Hook Eye screws (these will be used to support the load carried on the rods)
Copper tube connector (used to connect the rods together)
Copper tube 90 degree connector (used to connect the corner)
Fabric of your desire
Saw (to cut the rods. also bought at the .99 cent store)

total without fabric = $20.60


First I measured the dimensions of the area that I wanted to cover. One region was 134 inches, the other was 43 inches and another was 34 inches. Because my rods didn't span long enough I needed to connect them using copper tubes found in the plumbing section of home depot. I cut what was needed to span the area i wanted to cover. The rods were then connected by the copper tubing and held up by the hook eye screws that I put on the ceiling. The curtain hangers can then be slid on and fabric can be easily held by the clips.

This is how it looks.


With fabric


Design Improvements

To give a more fashionable appearance I stained the wooden rods with a 2 in 1 stain and polyurethane paint. If you wanted to save some money you can always take out the curtain hanger clips and directly put the fabric over the rod. This way, you don't need to paint the rod or buy the clips.


I hope you like my drape system. thanks for reading

kudos,
Jeff
 
Custom Search